Emacs Org's Column View
A short introduction to Org's column view.
Oct, 15th 2007
Please check the screencast demonstrating some of the possibilities I'm discussing here.
Also note that the column view feature is not available for Org < 5.01, Hence this feature is not in Emacs 22.1 (which comes with Org 4.67c.) Since Org is actively developed, it's always a good idea to upgrade to the latest version.
Introduction: the default column view
First press C-c C-x C-c to show the default column view. It turns
each outline item into a table row displaying some of its properties.
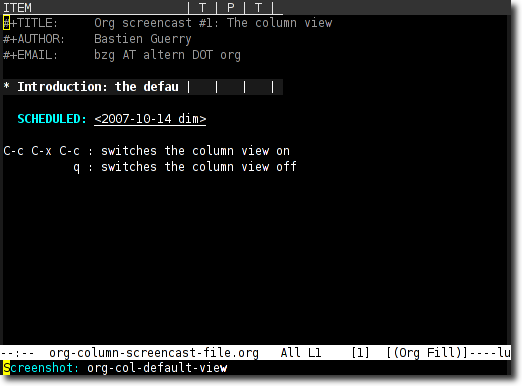
You can switch the column view off and return to the normal view by pressing `q' while the cursor is on the highlighted entry – but you can turn the column view on from any location in the buffer.
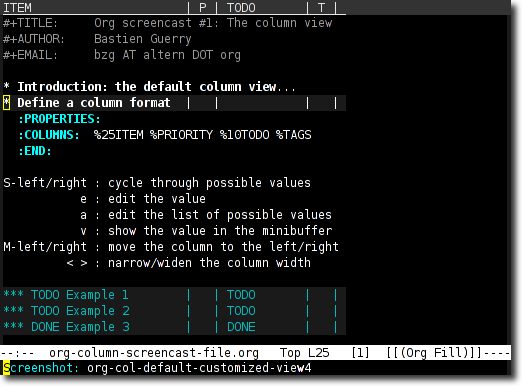
The first headline is now a row of browsable columns displaying properties. The first highlighted line of the buffer briefly tells you what property is displayed in each columns. In this screenshot it reads:
ITEM for the headline title
  T for the TODO keyword
  P for the priority cookie
  T for the tags
The default column only shows the item, the TODO state, the priority of the item and its tags, we will see later how to add other properties of your own.
This default setup is driven by the variable
org-columns-default-format, which global value is:
#+COLUMNS: %25ITEM %TODO %3PRIORITY %TAGS
| Element | Description |
|---|---|
| %25ITEM | display the item in a 25-characters-width field |
| %TODO | display the TODO state of the item |
| %3PRIORITY | display the priority in a 3-chars-width field |
| %TAGS | display the tags of the entry |
Slight customization of the default column view
Okay, so now we'd like to customize the column display.
For example, we'd like to change the width of the "priority" field and the "tags" field in the column:
#+COLUMNS: %25ITEM %5TODO %1PRIORITY %10TAGS
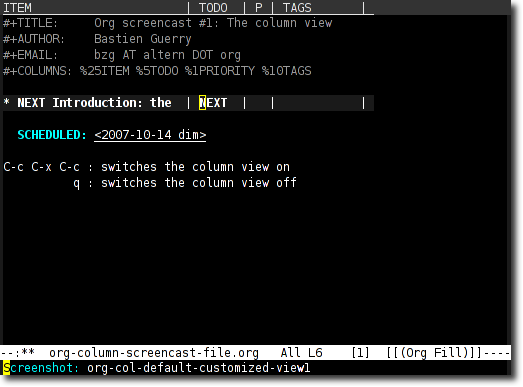
The TODO field (%5TODO) is now 5 characters wide, whereas the priority
and the tags fields are 1 and 10.
Now we'd like to change the title of the columns. For example – and since we are such hardworkers – each so-called item is in fact… a "task" :
#+COLUMNS: %25ITEM(Task) %5TODO(To-do) %1PRIORITY %10TAGS
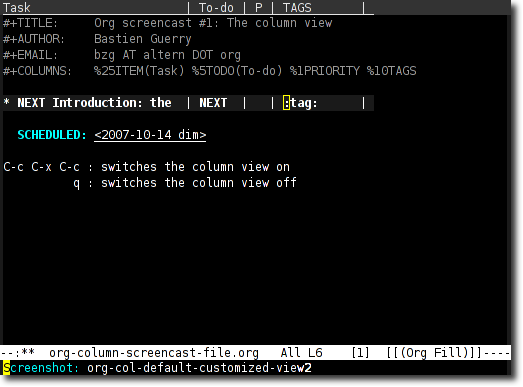
We also add a "To-do" label for displaying the TODO state for this entry.
Displaying other properties
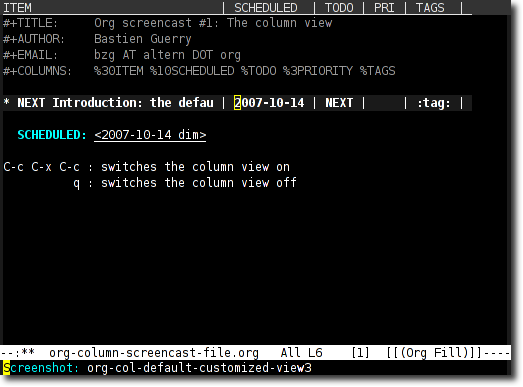
What if you want to display other properties in the column view? For
example, we'd like to display the SCHEDULED property. Then we need to
redefine the global #+COLUMNS option like this:
#+COLUMNS: %30ITEM %10SCHEDULED %TODO %3PRIORITY %TAGS
Refresh your Org buffer to take this change into account, then C-c C-x
C-c again on the entry. The column now shows the SCHEDULED property.
** Exemple of outline item with a SCHEDULED property
   SCHEDULED: <2007-10-14 dim>
What is the list of available properties? Here it is:
ITEM         The content of the headline.
TODO         The TODO keyword of the entry.
TAGS         The tags defined directly in the headline.
ALLTAGS      All tags, including inherited ones.
PRIORITY     The priority of the entry, a string with a single letter.
DEADLINE     The deadline time string, without the angular brackets.
SCHEDULED    The scheduling time stamp, without the angular brackets.
These are all special properties, but of course you can define your own properties.
Before going to the rather complex stuff you can do with your own properties, we'd like to know how to use different column views for different subtrees.
Defining a column format for a subtree
To define a colum view for a specific item, just add the special
property :COLUMNS: to it:
** Top node for columns view
   :PROPERTIES:
   :COLUMNS:  %25ITEM %TAGS %PRIORITY %TODO
   :END:
This view will be used for the entry and its entire subtree – unless some of its children has its own column view.
See for example this:
** Top node for columns view
   :PROPERTIES:
   :COLUMNS: %25ITEM %TAGS %PRIORITY %TODO
   :END:
*** TODO Example 1
*** TODO Example 2
*** DONE Example 3
Good.
But what if you suddenly prefer %TAGS to be at the right of %TODO?
Put the cursor in the %TAGS field and press M-<right>, it will move
the field to the right.
What if you want to make a field larger? No problem. Just go to that field and press `>' to widen the field (or `<' to narrow it.)
If you want to interactively define the column element of a property, go the its field and press `s'.
So now that we know how to customize the column view for each entry, it's time to play with user-defined properties.
Adding summary-types for some properties
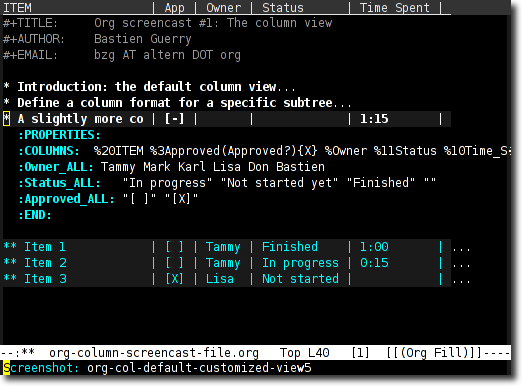
Let's define a new entry with its own column view and a few properties:
** My project
   :PROPERTIES:
   :COLUMNS:  %20ITEM %9Approved(Approved?){X} %Owner %11Status %10Time_Spent{:}
   :END:
Let's comment this a bit.
We have a :COLUMNS: property, defining the column view. It says:
| Element | Description |
|---|---|
| %20ITEM | display the item (20 characters for this field) |
| %9Approved(Approved?){X} | display the "Approved" property |
| %Owner | display the "Owner" property |
| %11Status | display the "Status" property |
| %10TimeSpent{:} | display the "Timespent" property |
What are {X} and {:}?
It defines summary-types.
{X} means: display [X] if all entries have a [X] value for their
"Approved" property ([-] or [ ] otherwise).
{:} means: display a summary of the time spend, by adding all the time
values found in the property "TimeSpent".
Once you get the :COLUMN: property defined, you can interactively add
any property with C-c C-x p. It will prompt you for the name of the
property, and offer default possible values depending on the _ALL
friend of the property (if any) or on the values found in the buffer.
Defining all the possible values for a property
Defining summary-types implies that you need to have a limited set of possible values for certain properties.
For example, the "Approved" value discussed above should take only two
values: [ ] and [X].
Same for the "Status" property: you might want to define only a few status like "In progress" "Not started yet" "Finished".
You can restrict the allowed values for any property using the _ALL
suffix like this:
** My project
   :PROPERTIES:
   :COLUMNS:  %20ITEM %9Approved(Approved?){X} %Owner %11Status %10Time_Spent{:}
   :Owner_ALL:    Tammy Mark Karl Lisa Don
   :Status_ALL:   "In progress" "Not started yet" "Finished" ""
   :Approved_ALL: "[ ]" "[X]"
   :END:
| Owner_ALL    | only accept Tammy Mark Karl Lisa Don                   |
| Status_ALL   | only accept "In progress" "Not started yet" "Finished" |
| Approved_ALL | only accept "[ ]" "[X]"                                |
Note: *_ALL properties are meta-properties, defining rules on how to
use the properties themselves.
When you're in a field of the column, you can define all the possible values for the associated property by pressing `a': it will prompt the current set of allowed values and you will be able to edit it.
Complete example with three items in the subtree
Here is a example on how the column view affect the display of an entry and its subtree. Take it and test it.
** My project
   :PROPERTIES:
   :COLUMNS:  %20ITEM %9Approved(Approved?){X} %Owner %11Status %10Time_Spent{:}
   :Owner_ALL:    Tammy Mark Karl Lisa Don
   :Status_ALL:   "In progress" "Not started yet" "Finished" ""
   :Approved_ALL: "[ ]" "[X]"
   :END:

*** Item 1
    :PROPERTIES:
    :Owner:    Tammy
    :Time_spent:   1:45
    :Status:   Finished
    :END:

*** Item 2
    :PROPERTIES:
    :Owner:    Tammy
    :Status:   In progress
    :Time_spent:   0:15
    :END:

*** Item 3
    :PROPERTIES:
    :Owner:    Lisa
    :Status:   Not started yet
    :Approved: [X]
    :END:
Editing properties from the column view
So far, so good. But one great thing about the column view is that it lets you access and edit any property very quickly.
See this:
** My project
   :PROPERTIES:
   :COLUMNS:  %20ITEM %10Approved(Approved?){X} %Owner %11Status %10Time_Spent{:}
   :Owner_ALL:    Tammy Mark Karl Lisa Don
   :Status_ALL:   "In progress" "Not started yet" "Finished" ""
   :Approved_ALL: "[ ]" "[X]"
   :END:
Use v to display the field value in the minibuffer.
Use e to interactively select/edit the value.
Use S-left/right to cycle through the allowed values in a field.
Use a to edit the allowed values for this property.
Nice, isn't it?
Conclusion: more to come
Okay, that's all for today. But let me drop two last hints to let you explore column views further:
- You can use the column view and cycle through visibility.
- The column view also works in agenda buffers.
I guess this is already suggestive enough…
Enjoy!